Why RunCloud?
Runcloud makes server management simple and deploying of new webapps a breeze. Wordpress and many other platforms are supported along with Github for code management. If you are not using RunCloud then the nginx configuration below will have to be added to your NGINX config block.
How do I serve WEBP images?
I use img-optimize by VirtuBox to optimize my JPG and PNG files and also create a highly optimized WEBP version. img-optimize can be found at https://virtubox.github.io/img-optimize/. The first file we create is webp.conf which serves as a helper to allow the second Nginx configuration file and its use of the variable $webp_suffix. The second configuration file will follow the naming format of webappname.location.main.extra.conf This second file must be replicated for each webapp (website) that we want to actually serve webp files (and cache content). The first 6 lines of webappname.location.main.extra.conf attempt to serve the WEBP file instead of JPG or PNG if the file exists and the user’s web browser supports it. RunCloud’s NGINX now supports WEBP by default, we just need to tell it to try the webp file before trying the jpg/jpeg/png files.
The remaining portion of webappname.location.main-before.extra.conf will increase the expiration time of cached static content to 1 year. It is currently written to include media files, font files, javascript, css, and much more. Javascript and CSS are in their own section and can be modified for more or less time if needed. This helps your visitor’s browser to know that it is okay to cache this content which reduces bandwidth consumption and helps to better their on site experience. It also helps boot GTMetrix and PageSpeed scores which have a large effect on SEO rankings. Files that should not be cached long such as your RSS or Atom feed are stored for 1 hour while manifest, appcache, html, xml, and json files will not be cached.


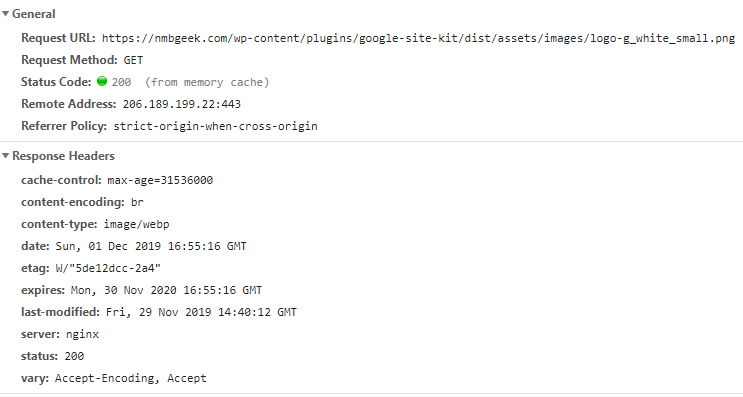
How can I see a WEBP being served and check my cache policy?
You can see from these response headers below that a PNG file was requested however a WEBP file was served. You will also see that it has an expires date of 1 Year from the request date. I am also directly serving WEBP files now so this hopefully only acts as a fall back for this site’s WEBP images. If you inspect my headers on this page which you can do by pressing F12 in Chrome or Firefox and selecting the Network tab and refreshing the page you will likely see a direct WEBP request. This is done through a third party plugin however while it rebuilds my site’s static cache this script acts as a fallback to make sure I am always serving WEBP images. If you are looking for the ultimate and easiest Wordpress Optimization and Caching solution I highly suggest Swift Performance.
WARNING: Before running any scripts on your server or making modifications please make sure you understand what the script is doing!
First read up on RunCloud’s Nginx Cheat Sheet here to understand why we are going to be creating the file webappname.location.main.extra.conf and where that is actually used in your webapp’s Nginx configuration: https://runcloud.io/docs/guide/cheat-sheet/nginx
Basically RunCloud uses a modified version of Nginx and you do not want to modify the primary Nginx configuration files as they may be overwritten with updates or rebuilding of your web application. To make up for that you can place additional Nginx site configuration files in the extra.d folder located at /etc/nginx-rc/extra.d/ We will be using the name format webappname.location.main-before.*.conf because it is pulled into the main area of the Web App’s Nginx config file.
Modify Nginx Configuration for RunCloud to serve WEBP
First we want to add WEBP support to our main Nginx configuration. This should be enabled by default now.
sudo echo -e 'map $http_accept $webp_suffix {default "";\n "~*webp" ".webp";\n}' > /etc/nginx-rc/conf.d/webp.confThis creates the file /etc/nginx-rc/conf.d/webp.conf with this content:
map $http_accept $webp_suffix { default ""; "~*webp" ".webp"; }Modify our RunCloud Web Apps for WEBP and Cache
Now we can setup our configuration for each Web App independently to serve the WEBP files and cache content in the users browser. Essentially this file would be replicated for each site you wish to apply these optimizations. We will name our Web App’s config file: webappname.location.main.extra.conf To create the file use this command with WEBAPPNAME replaced with the Web App name you used when creating your site in RunCloud’s control panel.
Do this from your web applications configuration in the Runcloud control panel to guarantee it sticks between rebuilds and is formatted correctly.
Under “NGINX Config” select the ‘location.main-before’ and I name mine ‘webp’
#Serve Webp (Comment this out if you are using CloudFlare Polish and you also don't need to worry about converting to webp!)
location ~* \.(png|jpe?g)$ {
expires 1y;
  add_header Vary Accept;
  try_files $uri$webp_suffix $uri =404;
}

# Expire rules for static content
# cache.appcache, your document html and data
location ~* \.(?:manifest|appcache|html?|json)$ {
  expires -1;
 }

# Feed
location ~* \.(?:rss|atom)$ {
  expires 1h;
  add_header Cache-Control "public";
}

# Media: images, icons, video, audio, HTC
location ~* .(ico|css|gif|jpe?g|png|gz|zip|flv|rar|wmv|avi|css|js|swf|png|htc|mpeg|mpg|txt|otf|ttf|eot|woff|woff2|svg|webp|avif)$ {
  expires 1y;
  access_log off;
  add_header Cache-Control "public";
}
Last updated on 2025-07-09 / Affiliate links / Images from Amazon Product Advertising API